
Propagation
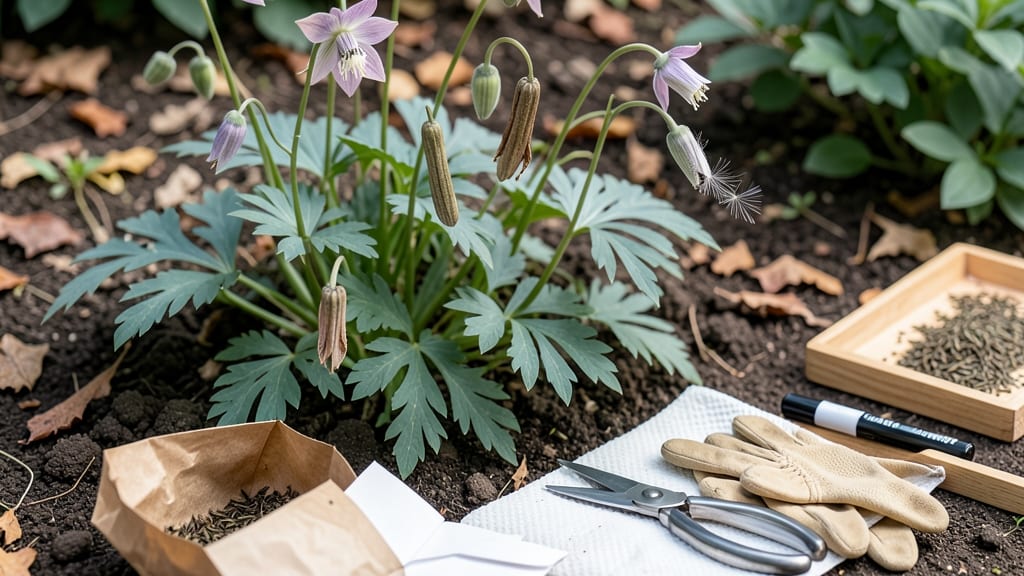
How to collect columbine seeds transforms next year’s garden before winter even arrives. 🌱 The key is timing—wait until those papery pods turn brown but haven’t split open, then gently harvest them before squirrels or wind scatter them. I’ve saved seeds from my own plants for five years now, and the secret isn’t complicated: patience and knowing exactly when to act.
You’ll need just three things: a pair of clean pruners, a paper bag for drying, and a cool, dark spot for storage. The pods should rattle when shaken—that’s your signal they’re ready.
Once collected, let them dry completely (about two weeks) before storing them in an envelope. Premature opening is the biggest challenge, but proper timing solves that.
By spring, you’ll have fresh columbine seedlings popping up where you scattered them last fall. The plants grow wild and self-seeding, but collecting seeds gives you control over placement and variety. Plus, you’ll save money and avoid store-bought plants that often struggle to adapt.
Works for all columbine varieties—from classic red to delicate white—and even thrives in partial shade. Here’s how to do it right the first time, with no wasted effort or lost seeds.
📚 In This Guide
- What you need
- Instructions
- Tips and common mistakes
- Wrapping up and next steps
What you need
- ● Mature columbine plants – Choose healthy, fully bloomed plants with seed pods (usually in late summer or early fall).
- ● Pruning shears or sharp scissors – For cleanly harvesting seed pods without damaging the plant.
- ● Paper bags or breathable mesh bags – 2-3 bags (10x12 inches each) to collect and dry the pods. Avoid plastic to prevent moisture buildup.
- ● Labeling tags or markers – To note the columbine variety and harvest date.
- ○ Glove (optional but recommended) – Protects hands from prickly seed pods.
- ● Drying tray or cardboard box – For arranging pods in a single layer to dry indoors.
- ● Small fan or dehumidifier – Speeds up drying in humid climates.
- ● Seed envelope or airtight container – For long-term storage after seeds are fully dried.
- ● Notebook – To track germination success rates for future reference.
Step-by-Step instructions for harvesting columbine seeds
Here’s how I collect columbine seeds year after year—no fancy tools, just patience and timing.
🌱 Step 1: Identify Mature Seed Pods
Wait until late summer or early fall when the flowers have faded and the seed pods turn from green to brown. These pods will feel dry and papery to the touch—almost like crinkling paper. If you pick them too early, the seeds won’t be fully developed, and the pods may still be green and moist.
Look for pods that are fully elongated and starting to split open at the seams. This is your cue that the seeds inside are ready. I like to check them in the morning when the dew has dried, so I can see the color and texture clearly. If the pods are still green, give them another week or two.
✂️ Step 2: Harvest the Seed Pods Gently
Use clean, sharp scissors or pruning shears to snip the pods from the stem. Cut about 1 inch below the pod to avoid damaging the plant. Be gentle—columbine plants are delicate, and rough handling can stress them or even break the stems.
Place the pods in a paper bag or a breathable container. Avoid plastic bags, which can trap moisture and cause the pods to rot. I like to label the bag with the date and the columbine variety if I’m growing multiple types. This helps me keep track of when they were harvested and how long they’ve been drying.
🪴 Step 3: Dry the Seed Pods Thoroughly
Let the pods dry in a warm, dry place with good air circulation for about 2-3 weeks. I spread them out on a mesh screen or hang them upside down in a paper bag with holes punched in it. This prevents mold and ensures even drying.
Check the pods regularly to make sure they’re fully dry. When you gently squeeze a pod, it should feel hollow and brittle. If it still has any moisture inside, give it a few more days. Overly damp pods can develop mold, which will ruin your seeds. Once they’re dry, the pods will easily split open when you handle them.
🌱 Step 4: Extract and Store the Seeds
Once the pods are completely dry, place them in a clean, dry container and gently crush or roll them to release the seeds. Columbine seeds are small and dark, often with a slight fuzzy texture. I like to use a small bowl and tap the pods lightly with a spoon to avoid losing any seeds.
Store the seeds in a sealed envelope or small jar in a cool, dry place. They’ll stay viable for 1-2 years if kept dry. I label the container with the date and variety to keep things organized. If you’re planning to plant them the following spring, you can even refrigerate them to mimic winter conditions and improve germination.
⏰ Step 5: Plant the Seeds in Fall or Early Spring
For the best results, sow columbine seeds outdoors in fall or early spring. Scatter them on the soil surface—columbine seeds need light to germinate, so don’t bury them. Press them lightly into the soil and water gently to keep the surface moist.
Keep the soil consistently moist but not soggy until the seeds germinate, which can take 2-4 weeks. Once the seedlings appear, thin them to give each plant enough space to grow. Columbine seeds are slow to mature, so be patient—it may take 2 years for them to bloom after sowing.
Tips & tricks for perfect columbine seed collection
These little tricks will ensure you don't miss a single seed and keep your columbine plants thriving for years.
Timing is Everything: I can't stress this enough—harvesting at the right moment makes all the difference. In Step 1, when checking for mature pods, look for that distinctive papery texture and the telltale seam splitting. The morning after a dry night is the best time to inspect them, as dew can make green pods appear brown. If you're unsure, wait a week—better to harvest late than risk underdeveloped seeds.
Gentle Handling Matters: Columbine plants are delicate, so in Step 2, use pruning shears to cut about 1 inch below the pod rather than pulling. This prevents stem damage that could stress the plant. When placing pods in your paper bag, leave some space between them—crowding can trap moisture and lead to mold. I've learned this the hard way after losing entire batches to dampness.
Drying Secrets: The 2-3 week drying period in Step 3 is non-negotiable, but here's what I've discovered works best: Spread pods on a mesh screen in a spot with indirect sunlight—direct sun can cause uneven drying. For extra air circulation, I hang mine upside down in a paper bag with holes punched in it. Check regularly by gently squeezing—if it feels hollow and brittle, it's ready. If not, give it another week rather than rushing it.
Seed Extraction Hack: When extracting seeds in Step 4, I've found a simple trick that saves seeds and sanity: Place pods in a clean bowl and gently tap them with a wooden spoon rather than crushing. This releases seeds gradually without creating a mess. For stubborn pods, roll them between your palms—this works especially well for the fuzzy-textured seeds that tend to cling.
Pro Tips for Collect Columbine Seeds
- These little tricks will ensure you don't miss a single seed and keep your columbine plants thriving for years.
- Timing is Everything: I can't stress this enough—harvesting at the right moment makes all the difference. In Step 1, ...
- Gentle Handling Matters: Columbine plants are delicate, so in Step 2, use pruning shears to cut about 1 inch below th...
Frequently asked questions
about collecting columbine seeds—because every gardener deserves a little clarity!When is the best time to harvest columbine seeds?
Collect seeds when the pods turn brown and papery (usually late summer to early fall). If you wait too long, the pods may split open and scatter seeds. Harvest them before they dry completely on the plant to avoid losing them to wind or wildlife.
How do I know if the seeds inside are viable?
Viable columbine seeds are plump, firm, and dark (often black or brown). If they’re shriveled, light-colored, or empty-sounding when shaken, they’re likely non-viable. Store only the good ones in a cool, dry place for planting next spring.
What if my columbine pods don’t open naturally?
If pods stay closed, gently snip them with scissors or pruners once they’re dry. Avoid crushing them—columbine seeds need that papery pod to protect them during stratification (a cold period that mimics winter). Place them in a paper bag for a few weeks to dry further before storing.
Can I collect columbine seeds from wildflowers?
Yes, but check local regulations first—some wild columbines are protected. If harvesting from the wild, take only a few pods from different plants to preserve genetic diversity. Avoid roadsides or areas with potential contamination (like pesticides). Nature thanks you!
How long can I store columbine seeds before planting?
Fresh seeds germinate best, but they’ll stay viable for 1–2 years if stored properly in a sealed container with silica gel or in the fridge. For best results, plant them within 6 months. Cold stratification (4–6 weeks in the fridge) boosts germination rates!
Wrapping up and next steps
Collecting columbine seeds is a rewarding way to ensure your garden blooms with vibrant colors year after year!
By following these simple steps—waiting for the pods to dry, harvesting them gently, and storing them properly—you’re not just preserving beauty, you’re nurturing the future of your garden. Now that you’re armed with the know-how, why not share your newfound skills? Try swapping seeds with fellow gardeners or planting a few extra to brighten up a friend’s space.
Happy growing! 🌸