
Container Gardens
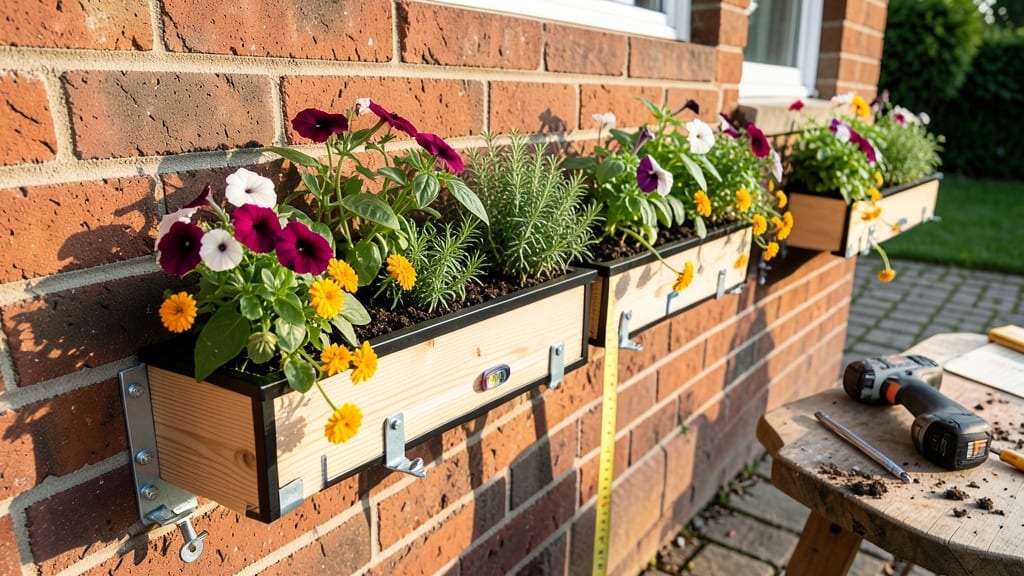
Brick walls and window boxes were made for each other—if you mount them right. 🌿 The trick isn't just hanging pretty planters; it's creating a system that survives rain, wind, and years of seasonal weight shifts without sagging or cracking.
I've learned the hard way which brackets hold and which fail, and the difference between a flimsy setup and one that lasts a decade starts with these five key steps.
You'll need heavy-duty L-brackets (not flimsy plastic hooks), a masonry drill bit, concrete anchors, a level, and—most importantly—a helper. Brick's uneven surface means pre-drilling is non-negotiable, and skipping this step leads to wobbly boxes that tilt after the first heavy rain.
The right tools turn what feels like a DIY nightmare into a project that transforms your home's exterior into a thriving green display.
By the end, you'll have boxes that stay perfectly level, drain properly, and hold up to overflowing petunias or trailing ivy without bending.
The brackets disappear into the wall, leaving clean lines and a professional look that makes neighbors ask, "How'd you do that?"—while your plants enjoy years of stable, weatherproof support. No more wrestling with sagging boxes or patching cracked mortar.
We'll cover the exact bracket spacing for different box sizes, how to hide unsightly hardware, and the one drainage trick that prevents root rot. Whether you're dressing up a historic brick facade or modernizing a new build, these methods work—without requiring a contractor. Let's get those boxes mounted for good.
📚 In This Guide
- What you need
- Instructions
- Tips and common mistakes
- Wrapping up and next steps
What you need
- ● Window boxes: 2–4 boxes (depending on your window size; 6–12 inches deep, 12–18 inches wide, and 12–24 inches long for standard brick walls). Opt for heavy-duty cedar, resin, or metal (galvanized steel or aluminum) for longevity.
- ● L-brackets or J-hooks: 4–8 brackets per box (stainless steel or powder-coated for rust resistance). Choose brackets rated for 20–50 lbs per hook (or more if your boxes are extra heavy).
- ● Heavy-duty screws: 1/4"–3/8" diameter, 2–3" long (stainless steel or galvanized). Use masonry screws for brick or lag shields + wood screws if attaching to a wooden sill.
- ● Anchors (if needed): Sleeve anchors or toggle bolts (for hollow brick or weak mortar). Size should match screw diameter.
- ○ Wood backing board (optional but recommended):strong> 1x4 or 1x6 pine board, cut to fit behind the box for extra support.
- ● Waterproof membrane: Self-adhesive flashing tape (1–2 inches wide) to protect brick from moisture.
- ● Caulk or silicone sealant: Acrylic latex or paintable silicone for weatherproofing gaps.
- ● Drill/driver with masonry bit (for brick) and wood bit (for backing board).
- ● Level (2–3 ft) to ensure boxes are perfectly straight.
- ● Measuring tape and pencil for marking.
- ● Hammer (for setting anchors, if used).
- ● Safety glasses and dust mask (brick dust is no joke!).
- ● Putty knife (for applying caulk).
- ● Stud finder (if attaching to a wooden sill behind brick veneer).
- ● Check weight limits: Ensure your brackets + boxes don’t exceed 10–15 lbs per linear foot (brick may not handle heavier loads).
- ● Inspect brick condition: Avoid mounting over cracked mortar or loose bricks—repair first!
- ● Plan for drainage: Pre-drill 1/4" holes in the bottom of your boxes (or use a slatted design).
- ○ Optional upgrades: Drip irrigation kit for hassle-free watering.
- ● LED strip lights for nighttime ambiance.
- ● Paint or stain for matching your home’s aesthetic.
Instructions for mounting window boxes on brick walls
Here’s how to secure window boxes to brick without damaging either—proven methods for a sturdy, show-stopping display.
🪴 Step 1: Measure and Mark Mounting Points
Use a tape measure to determine the exact width of your window box (usually 12-24 inches for standard designs). Mark the center of each side with a pencil—these will be your anchor points. For 4 window boxes, repeat this process for each box. I like to use painter’s tape to create a small target where the screws will go, so I don’t accidentally drill off-center.
Hold the window box against the brick wall at your desired height (typically 36-48 inches from the sill for balance). Use a level to ensure it’s perfectly horizontal—adjust your pencil marks if needed. If the wall isn’t perfectly flat, mark the highest and lowest points to account for unevenness. This step prevents crooked boxes that look amateurish.
✂️ Step 2: Drill Pilot Holes for Heavy-Duty Anchors
Switch to a 1/8-inch drill bit and create pilot holes at each marked point. Drill just deep enough to make a small indentation—about 1/4 inch deep. This prevents the brick from cracking when you insert larger anchors later. I always wear safety glasses here; brick dust flies fast, and you don’t want it in your eyes.
For 4 window boxes, you’ll need 2 anchors per box (one on each side). If your boxes are wider than 18 inches, add a third anchor in the center for extra stability. Skip the hammer and nail method—brick is too hard, and nails won’t hold weight. Instead, we’re using masonry screws or toggle bolts (which you’ll install next).
💧 Step 3: Install Masonry Anchors or Toggle Bolts
Insert plastic sleeve anchors (or toggle bolts if your boxes are extra heavy) into the pilot holes. Tap them in gently with a hammer until they’re flush with the brick surface. For 4 window boxes, you’ll need 8 anchors total. If you’re using toggle bolts, position them so the wings sit behind the brick—this creates a mechanical grip that holds 50+ pounds per anchor.
Here’s the thing—don’t over-tighten. Snug is enough. Over-torquing can strip the anchor or crack the brick. Once installed, give each anchor a slight tug to confirm it’s secure. If any wobble, remove and reinsert it deeper. This is your last chance to fix mistakes before attaching the boxes.
🪴 Step 4: Attach Window Boxes with Heavy-Duty Screws
Position the first window box against the wall, aligning it with the anchors. Use a 1/4-inch drill bit to pre-drill holes through the box’s mounting brackets (if they have them) or directly into the wood if it’s solid. Insert 3-inch masonry screws through the box and into the anchors. Tighten them just enough to hold the box firmly—no need to strip the wood.
For 4 window boxes, repeat this for each one, working from left to right. If your boxes have pre-drilled holes, use them—this ensures even weight distribution. Double-check that each box sits level. If one tilts, loosen the screws slightly and adjust before retightening. Uneven boxes look sloppy and can cause drainage issues for plants.
⏰ Step 5: Test Stability and Add Finishing Touches
Give each window box a firm push to test stability. It should hold without wobbling or shifting. If any box feels loose, add an extra anchor or screw. Now’s also the time to add waterproof caulk around the back edge of each box to prevent moisture from seeping into the wall. A 1/8-inch bead along the seam is plenty—too much will trap water.
Finally, add your soil and plants. Fill the boxes with lightweight potting mix (regular garden soil is too heavy) and arrange plants so the heaviest ones sit toward the front. This keeps the box balanced and prevents it from tipping forward over time. Step back and admire your work—you’ve just created a display that’ll last for years.
Tips & tricks for heavy-duty window box mounting
These practical tips will help you avoid common pitfalls and create a professional-looking installation that lasts.
Precision is Key in Step 1: I can't stress enough how important it is to use a level when marking your pencil lines in Step 1. Even a slight tilt will throw off the entire installation. Pro tip: Place your window box against the wall and trace the bottom edge with a pencil before marking your anchor points—this ensures perfect alignment from the start. For extra accuracy, use a laser level if you have one; it eliminates guesswork completely.
Anchor Selection Matters: When choosing between plastic sleeve anchors and toggle bolts in Step 3, consider your window box's weight and the brick's condition. Plastic anchors work well for standard 12-18 inch boxes with lightweight potting mix, while toggle bolts are better for wider boxes or when mounting near window edges where brick is thinner. I've found that toggle bolts hold 50+ pounds per anchor, which is perfect for heavy succulents or seasonal weight changes.
Safety First in Step 2: Don't skip the safety glasses when drilling pilot holes—brick dust is abrasive and can cause serious eye irritation. I also recommend using a dust mask if you're sensitive to brick particles. For the 1/8-inch drill bit, go slow at first to prevent the bit from wandering. If you hear the drill struggling, you're likely hitting a mortar line—just adjust slightly to stay in the brick itself.
Final Adjustment Secret: In Step 4, after attaching all boxes, do a final walkthrough with a flashlight at dusk to check for shadows that might indicate uneven mounting. This is when I catch most alignment issues. If you notice any boxes that look slightly higher or lower, don't panic—just loosen the screws slightly, adjust, and retighten. A little patience here prevents visible crookedness that's hard to fix later.
Pro Tips for Mount Window Boxes On Brick
- These practical tips will help you avoid common pitfalls and create a professional-looking installation that lasts.
- Precision is Key in Step 1: I can't stress enough how important it is to use a level when marking your pencil lines i...
- Anchor Selection Matters: When choosing between plastic sleeve anchors and toggle bolts in Step 3, consider your wind...
Frequently asked questions
Got questions about mounting window boxes on brick? You’re not alone! Here are some common concerns—and straightforward answers—to help you get started with confidence.
Can I mount window boxes on brick without damaging the wall?
Use masonry screws or brackets with rubber gaskets to avoid cracks. Pre-drill holes to prevent brick chips, and always check for mortar joints—these are weaker spots. For extra security, distribute weight evenly and avoid overloading boxes with heavy soil or large plants.
What’s the best time of year to install window boxes on brick?
Spring or early fall is ideal—mild weather means less risk of expansion/contraction issues with materials. Avoid freezing temps (which can damage brackets) or extreme heat (which may warp wood). If you’re in a warm climate, winter installation is fine, but use moisture-resistant brackets to prevent rust.
Do I need special brackets for brick, or will standard ones work?
Standard brackets can work, but masonry-specific brackets (with expansion anchors) are far more secure. For lightweight boxes, L-brackets with rubber pads may suffice. Heavier boxes (like cedar or metal) require heavy-duty masonry screws or toggle bolts for brick. Always test weight distribution before planting!
How do I keep water from leaking behind the window box?
Line the back of your box with waterproof landscape fabric or a plastic liner before mounting. Ensure brackets have sealed gaps or use silicone caulk around edges. For extra protection, tilt the box slightly forward (1–2 degrees) to shed rainwater. A drip tray beneath the box also prevents moisture damage to siding.
What if my brick wall has uneven surfaces? Can I still mount window boxes?
Yes! Use adjustable brackets or shims (thin wooden strips) to level the box. For severe unevenness, consider corner brackets with leveling screws or a floating shelf-style mount. Always check for plumb (vertical alignment) before securing—uneven boxes can stress brackets over time.
Wrapping up and next steps
Mounting window boxes on brick walls is a rewarding project that elevates your home’s curb appeal while creating a thriving garden space. With the right tools, a steady hand, and the techniques shared here—from securing brackets to sealing edges—you’ll enjoy a sturdy, long-lasting display that turns heads. 🌿
Ready to take the next step? Grab your materials, follow the plan, and soon you’ll be basking in the beauty of your newly installed window boxes! For extra inspiration, browse plant combinations that thrive in containers—your garden’s next chapter starts now.