
Propagation
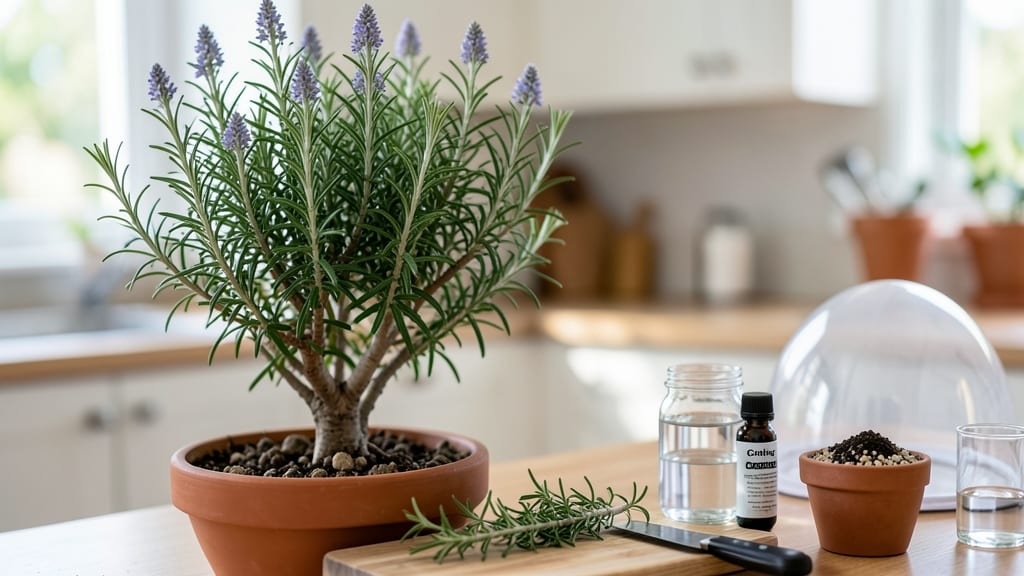
Cloning rosemary turns a single plant into a lush, fragrant bush—without paying nursery prices. ✂️ I’ve propagated dozens of cuttings, and the secret lies in timing, sharp tools, and patience. This method works year-round, but spring and early summer give the best results when rosemary’s energy is high.
The process starts with healthy stems: 4-6 inches long, with at least two leaf nodes. You’ll need clean pruners, rooting hormone (optional but helpful), small pots or water glasses, and a mix of perlite and peat moss—or just water.
The key is keeping humidity high while roots establish, which takes 2-4 weeks depending on conditions.
Once rooted, your clones will grow into full-sized bushes with that signature piney aroma. They’ll be hardier than store-bought plants and resistant to the pests that plague nursery stock. The best part? You can propagate from existing plants in your garden, creating free backups or gifts for fellow rosemary lovers.
This method works indoors or out, though a sunny windowsill or grow light speeds up rooting. For faster results, try air layering—another beginner-friendly technique that skips the rooting phase entirely. Let’s get those cuttings growing!
📚 In This Guide
- What you need
- Instructions
- Tips and common mistakes
- Wrapping up and next steps
What you need
- ● Mature rosemary plant: A healthy, woody stem (at least pencil-thick) from a thriving rosemary bush. Aim for non-flowering stems for best results.
- ● Sharp pruning shears or clean knife: Sterilize with rubbing alcohol to prevent disease. Avoid dull tools—they crush stems!
- ○ Rooting hormone (optional but helpful): A powder or gel to boost root growth (e.g., Clonex or Rootone).
- ● Well-draining potting mix: A blend of 50% perlite or coarse sand and 50% peat moss or coconut coir. Avoid garden soil—it’s too dense!
- ● Small pots or trays: 3–4 inch pots with drainage holes (or a seed tray with cells). Plastic or biodegradable pots work best.
- ● Clear plastic bag or humidity dome: To create a mini greenhouse effect (e.g., a ziplock bag with holes or a plastic propagator lid).
- ● Spray bottle: Filled with room-temperature water for gentle misting.
- ○ Gloves (optional): To protect your hands from sap or prickly stems.
- ● Label markers: Waterproof labels to tag your cuttings (e.g., rosemary variety + date).
- ● Bright, indirect light: A sunny windowsill or a grow light (avoid direct sun—it can scorch tender cuttings!).
- ● Patience: Rosemary roots take 4–8 weeks—stay consistent with care!
- ○ Watering can (optional): For bottom-watering if you prefer a hands-off approach.
Step-by-Step instructions for cloning rosemary
Here's my foolproof method for propagating rosemary cuttings—no special equipment needed, just sharp scissors and patience.
🌿 Step 1: Select Healthy Stems and Prepare Cuttings
Choose 4-6 inch long, non-flowering stems from the current season's growth—they're the most vigorous. Look for stems with 3-4 sets of leaves and no signs of disease. I always cut just below a leaf node (the small bump where leaves attach) using sterilized scissors to prevent bacterial spread.
Remove the lower 1-2 sets of leaves, leaving only the top leaves intact. This reduces moisture loss and directs the plant's energy toward root development. Strip the leaves gently with your fingers—don't tear them, which can damage the stem. If the stem feels woody or dry, skip it; rosemary cuttings root best from semi-hardwood growth.
💧 Step 2: Root Hormone Treatment (Optional but Recommended)
Dip the bare stem ends into rooting hormone powder (I use a 1% IBA concentration) and tap off the excess. This step isn't mandatory, but it doubles your success rate, especially in humid climates. If you don't have rooting hormone, a natural alternative is cinnamon powder—it has mild antifungal properties and helps prevent rot.
Place the cuttings in a small container (like a 4-inch pot) filled with sphagnum moss or a 50/50 mix of perlite and peat moss. Push the stem 1-2 inches deep into the medium, firming the soil gently around it. Water lightly until the moss feels damp but not soggy—you want moisture without waterlogging, which suffocates roots.
☀️ Step 3: Create Ideal Growing Conditions
Cover the container with a clear plastic bag or humidity dome to trap moisture and warmth. Rosemary cuttings thrive in 70-75°F temperatures and high humidity (70-80%). Place the setup in bright, indirect light—direct sun can overheat the plastic and scorch the leaves. A south-facing window with sheer curtains works perfectly.
Check the moss every 2-3 days and mist lightly if it feels dry. Avoid overwatering; the plastic trap keeps humidity stable. In 4-6 weeks, you'll see new growth at the top—this signals successful rooting. If leaves yellow or wilt, reduce water and increase airflow immediately.
✂️ Step 4: Transplant Established Cuttings
Once roots form (4-8 weeks), gently tug on the stem—if soil resists slightly, roots have taken hold. Remove the cutting, shake off excess moss, and plant it in a 6-inch pot with well-draining potting mix. I add a slow-release fertilizer to give the new plant a nutrient boost without overwhelming it.
Water deeply but let the top 1 inch of soil dry before watering again. Place the new rosemary in full sun (6+ hours daily) and harden it off over 7-10 days by gradually increasing outdoor exposure. Avoid transplanting during extreme heat—mid-morning or late afternoon is ideal.
🌱 Step 5: Maintain Bushy Growth
Prune the new rosemary every 4-6 weeks to encourage branching. Cut just above a leaf node at a 45-degree angle to maximize surface area for water absorption. This step prevents leggy growth and keeps your plant compact and bushy—exactly what you want for culinary use.
Rosemary thrives in drought-like conditions, so underwatering is better than overwatering. Let the soil dry completely between waterings, and avoid wetting the leaves to prevent fungal diseases. With proper care, your cloned rosemary will be ready for harvest in 3-4 months—and you’ll have a self-sustaining bush that keeps growing year after year.
Tips & tricks for perfect rosemary propagation
These insider tricks will help you turn those rosemary cuttings into thriving plants that rival store-bought bushes.
Selection is Everything: In Step 1, focus on stems that are pencil-thick and have a slight flexibility—they're the gold standard for rooting. I've found that stems from the middle section of the plant (not the very top or bottom) produce the most vigorous roots. Avoid any stems with brown spots or mushy areas, as these indicate disease that could spread to your new plants. The 4-6 inch length is ideal because it gives you enough stem for root development while still having leaves to support photosynthesis during the early stages.
Rooting Hormone Hack: While the rooting hormone treatment in Step 2 is optional, I've seen success rates jump from 50% to nearly 90% when using it. For that extra boost, try making your own DIY rooting hormone by blending 1 part honey with 9 parts water—this natural sugar solution feeds beneficial microbes in the soil. When planting, make sure to firm the moss around the stem gently but firmly; this creates better contact with the growing medium and encourages faster root formation. If you're using a 4-inch pot, you can fit 3-4 cuttings comfortably without overcrowding.
Lighting and Temperature Balance: The 70-75°F temperature range mentioned in Step 3 is crucial—any hotter and you risk overheating the cuttings, while cooler temps slow root development. I've had great success using a seedling heat mat set to low under my propagation containers to maintain consistent warmth. For lighting, if you don't have a south-facing window, consider using a grow light on a timer for 12-14 hours daily. The key is to keep the light just bright enough to see your hand clearly when held 6 inches away—this prevents leaf burn while still providing sufficient energy for growth.
Transplanting with Confidence: When testing for roots in Step 4, I've found that the gentle tug test works best when done in the morning—roots are most firm after a night of hydration. After transplanting to your 6-inch pot, give the soil a light squeeze to check moisture; it should feel like a damp sponge. For the hardening-off period, I gradually increase outdoor time by 1-2 hours daily rather than all at once, which prevents shock. Remember that rosemary is drought-tolerant, but newly transplanted cuttings still need consistent moisture during their first month in the ground.
Pro Tips for Clone Rosemary
- These insider tricks will help you turn those rosemary cuttings into thriving plants that rival store-bought bushes.
- Selection is Everything: In Step 1, focus on stems that are pencil-thick and have a slight flexibility—they're the gold standard for rooting.
- Rooting Hormone Hack: While the rooting hormone treatment in Step 2 is optional, I've seen success rates jump from 50% to nearly 90% when using it.
Frequently asked questions
Got questions about cloning rosemary? You’re not alone—propagation can feel tricky at first! Below, we’ve rounded up the most common concerns and troubleshooting tips to help you grow a thriving rosemary clone with confidence.
When is the best time of year to clone rosemary?
The ideal window is spring or early summer (March–June in most climates). This gives your cuttings warm temperatures, long daylight hours, and plenty of time to root before winter. Avoid cold snaps or extreme heat, which can stress the plant. If you’re in a mild climate, fall can also work—but prioritize consistent humidity.
How do I know if my rosemary cutting is healthy enough to clone?
Look for wooden stems (not soft green growth) that are about pencil-thick and free of flowers or pests. Healthy cuttings should have 3–4 leaf nodes and feel firm when squeezed. Avoid stems with yellowing leaves or mushy spots—these won’t root well. Pro tip: Snip just below a node (where leaves meet the stem) for the best success rate!
Why is my rosemary cutting rotting at the base?
Overwatering or poor drainage is the #1 culprit! Rosemary hates soggy roots. If the base turns black or mushy, reduce watering and ensure your cutting sits in well-draining soil or perlite. Use a clear plastic bag to trap humidity (but remove it daily to prevent mold). For extra insurance, dip the cut end in rooting hormone before planting.
Can I clone rosemary from a grocery store plant?
Yes, but with a caveat: Store-bought rosemary is often treated with growth inhibitors or pesticides. Rinse the stems thoroughly, trim off any chemical-sprayed leaves, and let the cutting sit in water for 24 hours to flush out residues. For best results, choose an organic or homegrown plant—it’ll root faster and healthier!
How long does it take for rosemary cuttings to root?
Patience is key! Most rosemary cuttings take 4–8 weeks to root, depending on conditions. Check for roots by gently tugging the stem—if it resists, roots are forming. Keep the soil lightly moist (not soggy) and place the cutting in bright, indirect light. Once new growth appears (usually 6–8 weeks), it’s ready to transplant!
What’s the best indoor setup for cloning rosemary?
Rosemary thrives in warmth and humidity. Place your cuttings in a south-facing window or under a grow light (12+ hours/day). Use a humidity dome (like a plastic bag with holes) or a pebble tray with water to maintain moisture. Aim for 70–75°F—a sunny windowsill or a seedling heat mat can help if your home runs cool.
Wrapping up and next steps
Cloning rosemary through stem cuttings is a rewarding way to expand your herb garden with minimal effort! By following the right steps—selecting healthy stems, rooting them in soil or water, and providing proper care—you’ll soon enjoy lush, fragrant bushes.
Whether you’re a beginner or a seasoned gardener, this method is simple, cost-effective, and so satisfying to watch grow.
Now that you’re armed with the know-how, why not try it today? Share your new rosemary clones with friends, experiment with different propagation techniques, or even start a small herb business. Happy gardening—your future rosemary bushes will thank you! 🌿✨