
Propagation
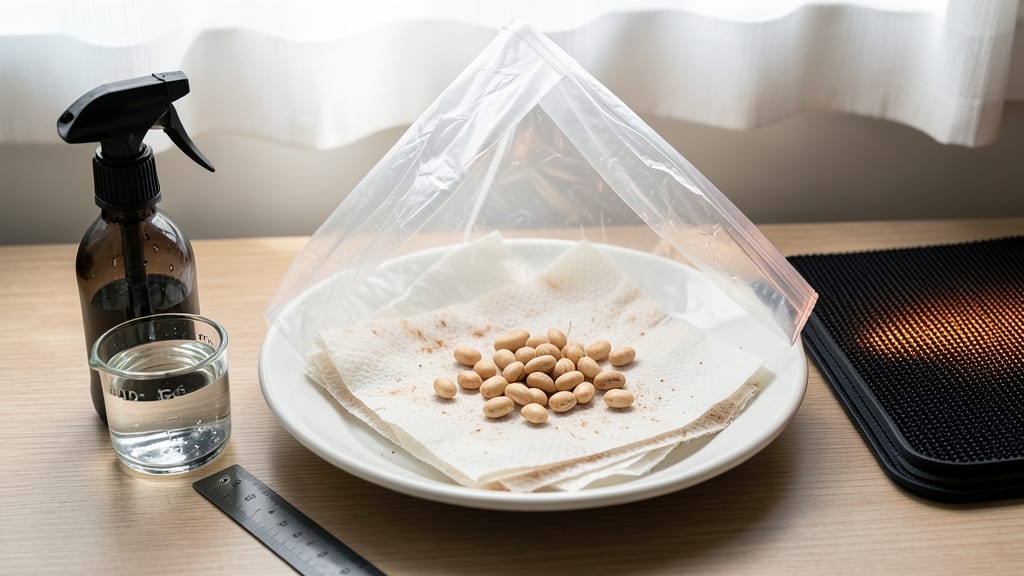
Germinating beans in paper towels gives you a head start on the growing season—3-day sprouts instead of waiting weeks for soil germination. 🌱 I tried this method after struggling with slow, uneven germination in my garden beds, and the difference was night and day.
No more staring at bare soil hoping for tiny green shoots to appear.
The secret lies in creating the perfect microclimate: warm, moist, and dark. You'll need just a few supplies—a paper towel, a sealed container, and a little patience. The method mimics how beans would germinate naturally in warm, damp soil, but with 100% control over moisture and temperature.
This isn't just faster—it's more reliable, especially for beginners who've lost seeds to damping-off or uneven sprouting.
By day 3, you'll have strong, white roots and little green hooks ready to plant. The paper towel method also lets you check each seed individually, so you know exactly which ones are viable before committing them to soil.
No more surprises when you plant and nothing comes up—just predictable, healthy starts every time.
Works for bush beans, pole beans, and even heirloom varieties that take longer to germinate. Once you've mastered this, you'll never go back to direct sowing again. Here's exactly how to do it—no fancy equipment needed.
📚 In This Guide
- What you need
- Instructions
- Tips and common mistakes
- Wrapping up and next steps
What you need
- ● Dry bean seeds: Choose fast-sprouting varieties like mung beans, black beans, or kidney beans (about 10-20 seeds for a small batch).
- ● Paper towels: 2-3 thick, lint-free sheets (e.g., Viva or Bounty). Avoid ultra-thin towels—they dry out too fast!
- ● Spray bottle: A 16-32 oz misting bottle (like a plant sprayer) for gentle hydration.
- ● Plastic bag or container: A ziplock bag (quart-sized) or a shallow glass/ceramic dish with a lid.
- ● Water: Room-temperature, chlorine-free (let tap water sit out for 24 hours or use filtered water).
- ● Seedling tray or egg cartons: For transferring sprouts after germination (if you’re not planting directly).
- ● Grow light: A LED bulb (6-12 inches away) if your space lacks natural light.
- ● Thermometer: To monitor ideal temps (70-80°F for faster sprouting).
- ● Label markers: To track seed types (if experimenting with multiple varieties).
Step-by-step instructions for germinating beans in paper towels
Here's the quick method I use to get beans sprouting in just 3 days—no soil, no mess, and no waiting weeks.
🌱 Step 1: Soak the Seeds Overnight
Place 4-6 bean seeds (I use kidney or pinto beans) in a shallow bowl and cover them completely with lukewarm water. Let them soak for 8-12 hours—this softens the outer coating and kickstarts germination. You'll see the seeds swell noticeably if you check in the morning.
Drain the water completely before transferring the seeds. If left sitting in water, they risk developing mold or rotting before they sprout. A quick rinse afterward removes excess moisture so they stay fresh for planting.
💧 Step 2: Wrap Seeds in Damp Paper Towels
Lay a single sheet of paper towel on a flat surface and place the soaked seeds about 2 inches apart in a single row. Fold another paper towel over the top and press gently to create a snug, even layer. This keeps moisture trapped while allowing airflow—critical for preventing rot.
Lightly mist the towels with water until they feel damp but not soggy. You want the seeds to stay hydrated without sitting in standing water. Place the wrapped seeds in a sealed plastic bag or between two plates to maintain humidity. Check daily and mist again if the towels dry out.
☀️ Step 3: Position for Warmth and Indirect Light
Store the wrapped seeds in a warm spot—70-80°F is ideal. I place mine on top of the fridge or near a sunny window during the day. Avoid direct sunlight, which can overheat the towels and dry them out too quickly. You'll see tiny white roots emerge first, usually within 24-48 hours.
Watch for the radicle (root) to grow to about ½ inch long before transplanting. This ensures the seedling has enough energy to establish itself in soil. If roots grow too long before planting, they may break during transfer.
🌿 Step 4: Transplant Sprouted Seeds into Soil
Fill small pots or seed trays with moistened potting mix and make a small hole about 1 inch deep with your finger. Gently place the sprouted seed into the hole, root-side down, and cover lightly with soil. Press the soil around the seed to secure it without compacting.
Water lightly to settle the soil, but avoid overwatering—soggy soil can suffocate the delicate roots. Place the pots in a warm, bright spot (but not direct sun) for the first 3-5 days to help the seedlings establish. You'll see the first true leaves appear within a week.
⏰ Step 5: Maintain Ideal Conditions for Fast Growth
Keep the soil consistently moist but not waterlogged. Stick your finger 1 inch into the soil—if it feels dry, water gently. Avoid letting the soil dry out completely, as this can stunt growth. Place seedlings near a south-facing window or under a grow light for 12-14 hours daily.
Within 2-3 weeks, your paper-towel sprouts will be ready for transplanting outdoors or into larger containers. The key to success is consistency: warmth, moisture, and light. If you notice yellowing leaves, it’s usually a sign of overwatering or too little light—adjust accordingly.
Tips & tricks for germinating beans in paper towels
Confession: I skipped the soaking step for years and wondered why my seeds never sprouted. Here's what I learned the hard way—and how to avoid those same mistakes.
Soaking Precision: The 8-12 hour soak is non-negotiable for kidney or pinto beans. Use lukewarm water (around 75°F)—too hot can cook the seeds, too cold won't activate germination. I test temperature by dipping my wrist; it should feel warm but not scalding. After draining, give seeds a quick shake to remove excess water—this prevents mold growth during the damp paper towel stage.
Paper Towel Technique: The key to Step 2 is creating a microclimate that mimics soil moisture. Use two sheets of paper towel—one as the base, one as the cover—and press them gently but firmly. This creates even pressure that helps roots grow straight downward. I fold the edges inward slightly to prevent moisture from escaping while still allowing airflow. If you notice condensation on the plastic bag, that's perfect—it means humidity levels are ideal.
Warmth Watch: That 70-80°F range in Step 3 is critical for speed. I place my setup on top of my fridge during winter months to maintain consistent warmth. If your home runs cooler, consider using a seedling heat mat (set to low) under the paper towels. Watch for the radicle—those tiny white roots—emerging within 24-48 hours as your confirmation that everything's working. If you don't see roots by 48 hours, gently peel back the top towel to check for moisture levels.
Transplant Timing: The ½-inch radicle length is your green light for transplanting. I use a small spoon to carefully lift each seedling by its roots to avoid damaging the delicate shoot. For the 1-inch planting depth, I make the hole with my finger but press the soil gently around the roots—this creates just enough pressure to anchor the seedling without compacting the soil. The first 3-5 days after transplant are critical for root establishment, so I keep my seedlings in a clear plastic dome to maintain humidity during this vulnerable period.
Pro Tips for Germinate Beans In Paper Towel
- Confession: I skipped the soaking step for years and wondered why my seeds never sprouted.
- Soaking Precision: The 8-12 hour soak is non-negotiable for kidney or pinto beans.
- Paper Towel Technique: The key to Step 2 is creating a microclimate that mimics soil moisture.
Frequently asked questions
Got questions about germinating beans in a paper towel?
You’re not alone! Here are answers to the most common queries to help you succeed with this easy, fast method.
How long does it take for beans to sprout in a paper towel?
With the right conditions, most beans (like kidney, black, or pinto) will sprout roots in 2–3 days and tiny shoots in 3–5 days. Keep the paper towel damp (not soggy) and warm (70–80°F) for the fastest results. Patience is key—don’t rush it!
Can I use any type of bean for this method?
Not all beans work equally well. Stick to dried beans (like kidney, black, or mung beans) or fresh, organic beans (like green beans). Avoid canned beans—they’re pre-cooked and won’t sprout. Pro tip: Soak them first for 8–12 hours to speed up germination!
What if my beans aren’t sprouting after 3 days?
Don’t panic! Check these fixes:
- Moisture: The paper towel should feel damp like a wrung-out sponge.
- Temperature: Keep them in a warm spot (like near a sunny window or on top of a fridge).
- Airflow: Gently flip the towel daily to prevent mold.
- Bean quality: Old or stored improperly? Try fresh beans.
Do I need to use a paper towel, or can I use something else?
Paper towels are convenient, but you can also use:
- Coffee filters
- Dampened paper napkins
- A clean kitchen towel
How do I transplant the sprouted beans into soil?
Once roots are 1–2 inches long and a tiny shoot appears, gently plant them in moist soil, about 1 inch deep. Handle them carefully—they’re fragile! Water lightly and keep the soil warm (70°F+) for the first week. Use a grow light if natural light is weak.
Wrapping up and next steps
Germinating beans in a paper towel is a simple, fast, and rewarding way to jumpstart your green thumb—no soil or sunlight required! 🌱 With just a few supplies and a little patience, you’ll have tiny sprouts ready to transplant in just three days.
Whether you’re a beginner or a seasoned gardener, this method is perfect for learning the basics of propagation.
Now that you’re armed with the know-how, why not take the next step? Try experimenting with different bean varieties or even grow your sprouts for snacks! The choice is yours—happy growing! 🌟