
Orchid Care
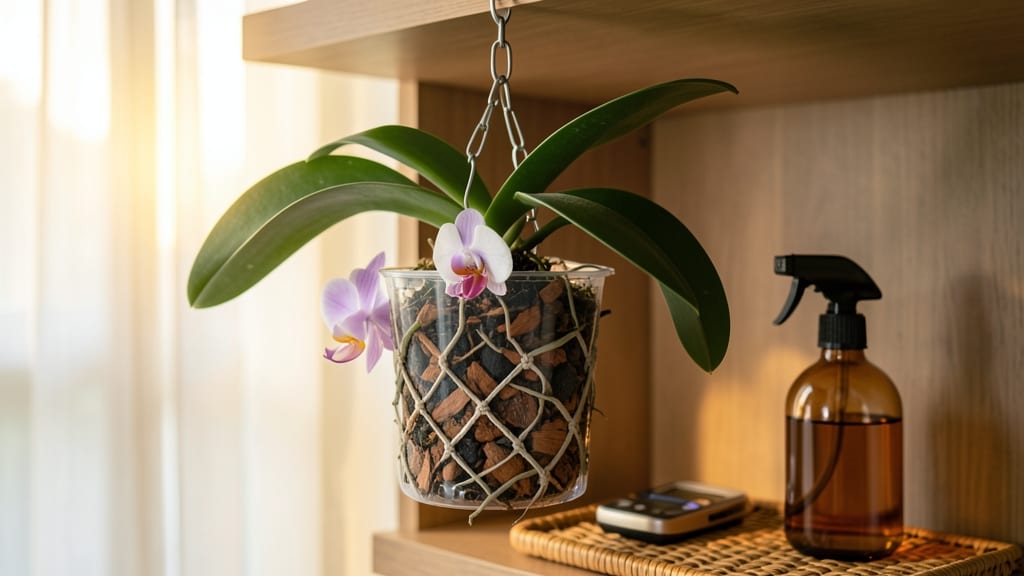
How to grow orchids upside down—zero soil, zero fuss—just vibrant blooms thriving like they’re meant to be. 🌿 I've grown orchids this way for years, and the results—strong roots, vibrant blooms, and plants that stay healthy for seasons—speak for themselves. This method isn't just creative; it's practical for small spaces and perfect for varieties like Vandas and Dendrobiums that naturally cling to trees.
The secret lies in the right setup: a sturdy container, a moisture-retaining medium like sphagnum moss, and a spot with bright, indirect light. You'll skip the heavy pots and root rot risks while giving your orchids the airflow they crave.
My first upside-down Dendrobium bloomed within 8 weeks—faster than any potted plant I'd grown before.
What you'll end up with is a collection of orchids that look like they belong in a tropical forest, not a windowsill. The roots stay visible, making it easy to monitor health, and the blooms arrive with more intensity than traditional methods.
No soil means no compacted roots or fungal issues, just pure, thriving growth.
Works for any skill level, from first-time growers to seasoned enthusiasts. The only requirement? Patience—these plants reward you with longer-lasting blooms when you let them grow their own way. Here's how to get started the right way.
📚 In This Guide
- What you need
- Instructions
- Tips and common mistakes
- Wrapping up and next steps
What you need
- ● Orchid plant: A healthy Phalaenopsis (moth orchid) or Dendrobium (great for beginners). Choose one with firm, green leaves and no signs of rot.
- ● Clear plastic or glass container: A 1-2 gallon size (e.g., a clean plastic tote, fish tank, or large jar). Ensure it has a secure lid with holes (¼" diameter, 2-3 holes) for airflow.
- ● Mounting material: Cork slabs: 1-2 pieces (½"–1" thick, cut to fit your orchid’s root spread).
- ● Orchid bark: 1-2 cups of fine to medium-sized (¼"–½") bark chips for drainage and aeration.
- ● Watering tools: Spray bottle: 1 (8–16 oz) with a fine mist nozzle for gentle hydration.
- ● Distilled or rainwater: 1 gallon (tap water can harm orchids long-term).
- ● Humidity tray: A shallow tray with pebbles and water to boost moisture (especially in dry climates).
- ● Grow lights: A LED full-spectrum bulb (12–14 hours/day) if natural light is <10 hours/day.
- ● Orchid fertilizer: A balanced 20-20-20 or 10-10-10 liquid fertilizer (diluted to half-strength).
- ● Twine or fishing line: For securing the orchid to the cork if needed.
Step-by-step instructions for growing orchids upside down
Here's how I've grown thriving orchids without soil—just air, water, and the right technique.
🪴 Step 1: Select the Right Orchid and Container
Phalaenopsis orchids thrive best upside down because their roots naturally cling to surfaces. Choose a healthy plant with firm, green roots and at least 3-4 leaves. I prefer clear plastic containers with 1-2 inch drainage holes—they let you monitor root health without disturbing the plant.
For containers, a 4-6 inch diameter plastic pot or even a repurposed glass vase works. The key is stability: place a small pebble or weight inside to keep the orchid from tipping. Avoid metal containers—they can conduct temperature changes too quickly and stress the plant.
💧 Step 2: Prepare the Upside-Down Setup
Fill the container with lukewarm water until it reaches about 1 inch below the plant's root base. I use filtered or distilled water because orchids are sensitive to chlorine and minerals. Place the orchid upside down in the container, ensuring the roots are fully submerged but the leaves stay dry.
Position the orchid so the rhizomes (thickened roots) hang freely into the water. The roots will naturally cling to the container's sides, creating a self-supporting structure. Check the water level every 3-4 days—it should never completely evaporate or become stagnant.
☀️ Step 3: Position for Optimal Light and Airflow
Orchids need bright, indirect light—think east or west-facing windows. A south window works if you filter the light with a sheer curtain. Too much direct sun will scorch the leaves, while too little light stunts growth. You'll know the light is right when the leaves stay a vibrant green, not yellow or pale.
Place the container in a spot with moderate airflow—a gentle breeze from a fan or open window helps prevent rot. Avoid drafty areas like near AC vents or open doors. I like to rotate the container a quarter turn weekly so the roots grow evenly around the sides.
⏰ Step 4: Maintain Water and Monitor Growth
Upside-down orchids need less frequent watering than traditional setups because the roots absorb moisture as needed. Refill the container when the water level drops to 1 inch below the roots. Overwatering is the biggest mistake—roots left in standing water will rot within 3-5 days.
Watch for new root growth along the container's sides. Healthy roots are thick, green, and firm to the touch. If you see black, mushy roots, it's a sign of rot—trim them immediately with sterilized scissors and adjust your watering schedule. Fertilize every 4-6 weeks with a balanced, water-soluble orchid fertilizer diluted to half strength.
✂️ Step 5: Encourage Blooming and Prune as Needed
When the orchid finishes blooming, the flower spike will turn brown and dry. Cut it back 1 inch above a visible node—this is where new blooms often emerge. I've found that upside-down orchids bloom more prolifically because the roots get better air circulation and light exposure.
If the plant outgrows its container, it's time to repot. Gently remove the orchid, trim any dead roots, and transfer it to a slightly larger container. The upside-down method works for years if you keep the roots healthy and the water fresh. With this setup, I've had orchids rebloom 2-3 times per year.
Tips & tricks for perfect upside-down orchid care
Here's what nobody tells you about keeping orchids thriving in this unconventional method—these details make all the difference.
Container Stability: Secure your orchid's upside-down position with care. For plastic pots, use a rubber band or twist ties to hold the cut edges firmly around the base without crushing the crown. In hanging baskets, ensure the orchid can't shift—roots should dangle freely but the plant itself should feel snug. I learned this the hard way when my first attempt wobbled and nearly toppled after just a week.
Root Inspection Technique: When checking roots weekly, focus on the texture rather than just color. Healthy roots should feel like firm, velvety ropes—if they're rubbery or hollow when pressed, they're stressed. I've found that roots often turn silvery-green before they're truly ready for fertilization, so wait until you see firmness before adding nutrients. This prevents overfeeding weak roots.
Light Positioning: The east-facing window recommendation is ideal, but if that's not available, rotate your orchid quarter-turn daily. This ensures all roots get equal light exposure, preventing one side from growing lopsided or weak. I keep a small sticky note on my window to remind me to rotate—it's easy to forget when you're checking roots every few days.
Humidity Maintenance: The pebble tray method works wonders, but be vigilant about water levels. Keep the tray filled with just 1 inch of water—any deeper and roots may absorb too much moisture. I've noticed condensation on the leaves is the best indicator of proper humidity levels (50-70%). If leaves start developing dark spots, it's usually a sign the humidity is too high or there's poor airflow.
Pro Tips for Grow Orchids Upside Down
- Here's what nobody tells you about keeping orchids thriving in this unconventional method—these details make all the ...
- Container Stability: Secure your orchid's upside-down position with care. For plastic pots, use a rubber band or twis...
- Root Inspection Technique: When checking roots weekly, focus on the texture rather than just color. Healthy roots sho...
Frequently asked questions
Got questions about growing orchids upside down? You’re not alone—this method is unique, and even experienced gardeners have curiosities! Below, we’ve rounded up the most common questions to help you feel confident before flipping those orchids.
Why grow orchids upside down? What are the benefits?
Growing orchids upside down mimics their natural epiphytic (tree-dwelling) habitat. Benefits include better airflow (reducing rot), easier water drainage (preventing soggy roots), and more efficient light absorption since the leaves can spread out. Plus, it’s a space-saving hack for small growers!
How long does it take for orchids to adjust to upside-down growing?
Most orchids adapt within 2–4 weeks, but some sensitive varieties (like Phalaenopsis) may take longer. Watch for yellowing leaves or dropped buds—these are signs of stress. If this happens, flip them back right-side-up temporarily while they recover. Patience is key!
Do I need to water upside-down orchids differently?
Since roots are exposed, soak them thoroughly every 7–10 days (or when the bark feels dry). Avoid overhead spraying—use a watering can with a narrow spout or dunk the pot in room-temperature water for 5–10 minutes. Let them drain completely before returning to their hanger.
Can I grow all types of orchids upside down?
Not all orchids thrive this way! Best candidates: Phalaenopsis, Cattleya, Dendrobium, and Oncidium. Avoid terrestrial orchids (like Paphiopedilum) or those with thick pseudobulbs, as they prefer soil support. Always research your orchid’s native growing conditions first!
What if my upside-down orchid gets pests or fungus?
Exposed roots are more vulnerable to pests (like scale or mealybugs) and fungus (e.g., root rot). Act fast: Isolate the plant, wipe roots with 70% isopropyl alcohol, and treat with neem oil or fungicide. Increase airflow by spacing plants apart—prevention is easier than a cure!
Still stumped? Drop your question in the comments—we’re happy to help you troubleshoot!
Wrapping up and next steps
Growing orchids upside down isn’t just a creative gardening trick—it’s a game-changer for thriving blooms with minimal fuss! By embracing this soil-free method, you unlock faster growth, better airflow, and stunning displays while keeping pests at bay. 🌱✨
Now that you’re armed with the right tools, techniques, and troubleshooting tips, it’s time to roll up your sleeves and give it a try! Start with one orchid, experiment with your setup, and watch your green thumb flourish. Your upside-down jungle is waiting—what are you growing first?