
Tools
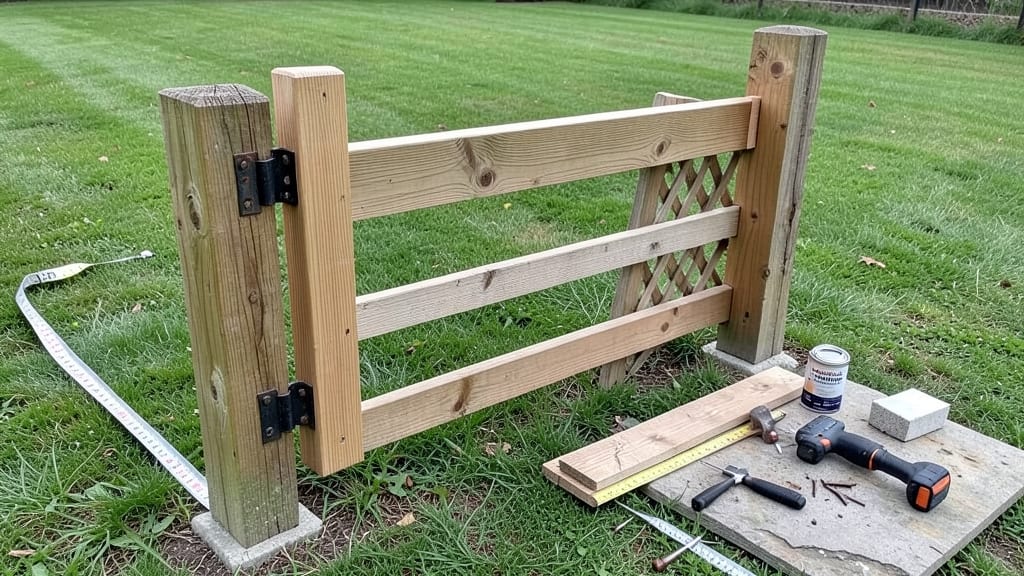
A simple garden gate transforms your yard into an inviting space—no fancy tools required. ✨ I built my first gate using reclaimed wood and a basic latch, and it’s held up for years with minimal upkeep.
The key is keeping it sturdy yet charming, perfect for small to medium gardens where every inch counts.
You’ll need just a few supplies: 2×4 lumber for the frame, 1×4 boards for slats, a sturdy hinge, and a latch or hook. Pre-cutting the wood to your gate’s height (typically 36–48 inches) saves time, and using galvanized screws prevents rust.
Eco-friendly options like reclaimed wood or cedar add rustic appeal while lasting longer.
By the end, you’ll have a gate that’s functional and stylish, blending seamlessly with your garden’s aesthetic. The latch keeps pets and kids safe while adding a polished touch. Plus, it’s a project that builds confidence—no prior carpentry skills needed.
Works for any yard style, from cottage gardens to modern landscapes. Here’s how to get started without breaking the bank or the rules.
📚 In This Guide
- What you need
- Instructions
- Tips and common mistakes
- Wrapping up and next steps
What you need
- ● Wood: 2x4 lumber (8 ft long) – 2 pieces (for vertical posts)
- ● Wood: 2x6 lumber (8 ft long) – 4-6 pieces (for horizontal slats, adjust based on gate height)
- ● Wood: 4x4 lumber (2 ft long) – 2 pieces (for gate posts, if not using 2x4s)
- ● Hardware: 3-inch exterior wood screws – 20-30 screws (stainless steel or galvanized)
- ● Hardware: Gate hinges – 2-3 hinges (heavy-duty, 4-inch or larger)
- ● Hardware: Latch or hook – 1 (for security)
- ● Tools: Tape measure
- ● Tools: Circular saw or miter saw
- ● Tools: Drill and drill bits
- ● Tools: Level
- ● Tools: Speed square
- ○ Tools: Clamps (optional but helpful)
- ● Safety: Work gloves and safety goggles
- ● Wood stain or paint – For a polished look
- ● Decorative hardware – Ornamental hinges or a vintage-style latch
- ● Weatherproof sealant – To extend the gate’s lifespan
- ● Pre-cut lattice panels – For a quicker assembly
Step-by-step instructions for building a simple garden gate
Here’s the straightforward method I’ve used to create sturdy, attractive gates that last for years—no fancy tools required.
🪴 Step 1: Gather Materials and Tools
For a 4-foot wide gate (standard for most yards), you’ll need:
- Two 4x4 pressure-treated posts (6 feet long)
- One 2x4 board (8 feet long) for the top rail
- Two 2x6 boards (8 feet long) for the horizontal slats
- Two hinges (3-inch heavy-duty, for outdoor use)
- One latch (matching your gate style)
- 3-inch exterior screws (stainless steel or galvanized)
- Galvanized nails (2-inch)
- Wood glue (optional, for extra reinforcement)
- Sandpaper (80 and 120 grit)
- Outdoor wood stain or paint (optional, for weather resistance)
Check your hinges and latch fit the gate width—most standard hardware works for a 4-foot span. Pre-drill all screw holes to prevent wood splitting, especially near the hinges. I always stain the wood before assembly to protect it from moisture and UV damage right away.
✂️ Step 2: Cut and Assemble the Gate Frame
Measure and mark your 4x4 posts to 5 feet tall (standard height for easy access). Cut them at a slight angle (about 5 degrees) at the top for a cleaner look where they meet the top rail. Use a circular saw or handsaw—take your time here for clean cuts.
Lay the 2x4 top rail horizontally and position the posts at each end, flush with the top. Secure them with 3-inch exterior screws (two per post) and a dab of wood glue for extra hold. Double-check the frame is square by measuring diagonally from corner to corner—both measurements should match.
Next, cut your 2x6 boards into three 2-foot-long slats (for a classic three-panel look). Space them evenly between the posts, leaving 2-inch gaps between each slat. Attach them with 2-inch galvanized nails (pre-drill to avoid splitting). This spacing allows airflow and reduces weight while keeping the gate sturdy.
🪴 Step 3: Install Hinges and Latch
Position the gate frame where it will hang, leaning it against the existing post or fence. Use a level to ensure it’s perfectly vertical before marking hinge placement. Hinges should be 6-8 inches from the top and 6-8 inches from the bottom—this prevents sagging over time.
Attach one hinge to the gate frame, then transfer the markings to the post. Pre-drill holes to avoid damaging the wood, then secure the second hinge. Test the gate’s swing—it should open and close smoothly without rubbing. If it sticks, sand any rough spots or adjust the hinge screws slightly.
For the latch, mark its position on the opposite side of the gate (about 3 feet from the ground for easy access). Attach it securely with 3-inch screws, then test the latch mechanism. A well-placed latch should catch smoothly without requiring force.
☀️ Step 4: Finish and Protect
Sand the entire gate with 80-grit sandpaper to smooth rough edges, then switch to 120-grit for a polished finish. Wipe away dust with a damp cloth before applying stain or paint. I recommend an outdoor-rated sealant for extra protection against rain and sun.
Let the finish dry completely (usually 4-6 hours, but check the product label). Once dry, give the gate one final test swing. If everything moves freely and the latch works, your gate is ready for years of use. For longevity, check the hinges and latch annually—tighten screws as needed to prevent loosening.
⏰ Step 5: Install and Enjoy
Lift the gate into place and secure it to the post with 3-inch screws (through the hinge side). If your gate is heavy, consider adding a support rod (a ½-inch metal rod) from the bottom of the gate to the post for extra stability.
Step back and admire your work—you’ve just built a functional, rustic gate that blends seamlessly with any yard. Pro tip: Add decorative hardware like wrought-iron accents or a simple rope wrap for a personalized touch. Now, all that’s left is to enjoy the satisfaction of a job well done.
Tips & tricks for building a sturdy garden gate
Here's what I've learned from years of building these gates—small details that make all the difference between a flimsy door and a lasting centerpiece.
Precision Cuts: When cutting your 4x4 posts to 5 feet tall, use a straightedge guide to ensure clean, square cuts. I mark the angle with a pencil first, then make the cut—this prevents the wood from shifting during the cut. For the 2-foot slats, measure twice and cut once; even a quarter-inch error can throw off the gate's balance. A miter saw gives the cleanest results, but a handsaw works if you take your time.
Hinge Placement: The 6-8 inch spacing from top and bottom for hinges isn't arbitrary—it's about weight distribution. Too high and your gate will sag; too low and it'll rub against the post when opening. I always mark the hinge positions with a pencil first, then use a level to verify vertical alignment before drilling. Pro tip: If your gate feels unbalanced after assembly, adjust the bottom hinge slightly higher to compensate.
Wood Prep: Sanding with both 80 and 120 grit paper might seem redundant, but it's worth the extra 10 minutes. The 80 grit removes saw marks and rough spots, while the 120 grit creates that silky-smooth finish that makes the stain adhere perfectly. I sand in the direction of the wood grain, then wipe away all dust before staining—this prevents grain raising that can ruin your finish.
Drying Time: Those 4-6 hours for the stain to dry completely might feel like forever, but rushing this step leads to smudges and uneven coverage. I use a hairdryer on cool setting to speed things up slightly (about 30 minutes faster), but only after the initial tacky phase has passed. Test the finish by pressing your finger gently—if it doesn't leave a mark, it's ready for installation.
Pro Tips for Make A Simple Garden Gate
- Here's what I've learned from years of building these gates—small details that make all the difference between a flimsy door and a lasting centerpiece.
- Precision Cuts: When cutting your 4x4 posts to 5 feet tall, use a straightedge guide to ensure clean, square cuts.
- Hinge Placement: The 6-8 inch spacing from top and bottom for hinges isn't arbitrary—it's about weight distribution.
Frequently asked questions
Got questions about building your own garden gate? You’re not alone! Here are some common concerns—and straightforward answers—to help you craft a sturdy, stylish gate with confidence.
What’s the best wood to use for a simple garden gate?
For durability and rustic charm, cedar, redwood, or pressure-treated pine are top picks. Cedar resists rot naturally, while redwood adds a rich, weathered look. Avoid untreated pine for long-term use—it warps faster. If budget is tight, reclaimed wood (like old pallets) can work too!
How long does it take to build a basic gate?
For a beginner, expect 4–8 hours total, spread over a weekend. Breaking it down:
- Prep & cutting: 1–2 hours
- Assembly & hinges: 2 hours
- Finishing (sanding/paint): 1–2 hours
Do I need a latch or lock for security?
A latch is essential for daily use—even a simple hook-and-eye latch ($5–$10) keeps pets/kids contained. For extra security, add a padlock (if storing tools/equipment) or a magnetic catch for a seamless look. Pro tip: Hide the latch mechanism inside the gate frame for a cleaner aesthetic!
Can I make a gate without hinges? (Sliding or freestanding options?)
Yes! Skip hinges with these alternatives:
- Sliding gate: Mount on a track system (DIY with PVC pipes or buy a kit). Best for narrow spaces.
- Freestanding gate: Use post anchors (concrete footings) or heavy rocks to weigh it down. Add a top rail for stability.
- Pivot gate: Bury a stone or metal post as the pivot point (no hinges needed!).
My gate won’t stay closed—what’s the fix?
Common culprits:
- Loose hinges: Tighten screws or add hinge shims for alignment.
- Uneven ground: Level the post holes or add gravel under the base.
- Weak latch: Upgrade to a spring-loaded latch or reinforce the gate frame.
- Wind/sway: Add diagonal braces between the gate and post.
Wrapping up and next steps
Building a simple garden gate is a rewarding project that adds charm and functionality to your outdoor space—and you’ve just mastered it! 🌿 Whether you used reclaimed wood for a rustic touch or fresh lumber for a clean look, the key was measuring carefully, securing hinges properly, and adding those finishing details like a sturdy latch or decorative knocker.
Now, take a step back and admire your handiwork—your garden’s new entrance is ready to welcome you (and maybe even a few curious critters!).
Ready for more? Next up:
- Paint or stain your gate for extra durability and curb appeal.
- Explore adding climbing plants or trellises for a lush, green frame.
- Try your hand at matching planters or a small bench to complete the look!