
Pruning
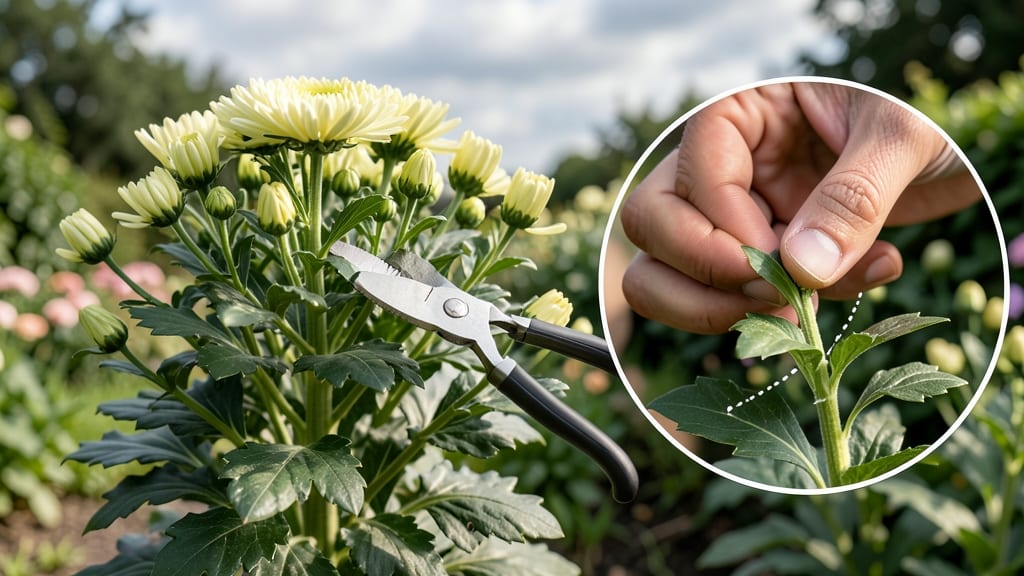
How to pinch back chrysanthemums isn’t just trimming—it’s the secret to bushier plants and longer-lasting blooms that turn heads at your local garden show. 🌸 I learned this the hard way after my first chrysanthemums grew leggy and sparse, but once I mastered the timing and technique, my plants transformed from scraggly to showstopping.
The key is doing it early—when plants are about 6 inches tall—and using your thumb and forefinger to pinch off the top set of leaves. This forces energy into side branches instead of one long stem.
Most gardeners stop here, but the real magic happens when you repeat the process 2-3 times over 4-6 weeks for that perfect rounded shape.
By the time fall rolls around, you'll have dense, compact plants packed with blooms that last weeks longer than unpinched varieties. The flowers themselves stay vibrant and sturdy, making them perfect for cutting or garden displays.
It's the difference between a handful of blooms and a full, lush plant that keeps giving.
Works for all chrysanthemum types—garden, spray, or pompon—and adapts to containers or garden beds. The only rule? Start early and be consistent. Here's exactly how to do it without a single mistake.
📚 In This Guide
- What you need
- Instructions
- Tips and common mistakes
- Wrapping up and next steps
What you need
- ● Sharp pruning shears or bypass pruners: Choose a pair with clean, sharp blades (4-6 inches long) to make precise cuts without crushing stems. Sterilize with rubbing alcohol before and after use.
- ● Gloves: Wear gardening gloves (nitrile or leather) to protect your hands from thorns and dirt.
- ● Chrysanthemum plants: Healthy, non-flowering plants (6-12 inches tall) with at least 4-5 sets of true leaves.
- ● Watering can or hose: For post-pruning hydration. Use room-temperature water to avoid shocking the plant.
- ○ Disinfectant (optional but recommended): A 10% bleach solution (1 part bleach to 9 parts water) to clean tools between cuts and prevent disease spread.
- ● Hand lens or magnifying glass: For inspecting leaf nodes closely when pinching.
- ● Plant markers: Label new growth if you’re experimenting with varieties.
- ● Pruning sealant: A wound dressing (like tree seal) to protect large cuts (though chrysanthemums heal quickly).
- ● Notebook or app: Track pinch dates and plant responses for future reference.
Step-by-step instructions for pinching back chrysanthemums
Here's how I transform leggy chrysanthemums into bushy, blooming powerhouses with just a few strategic cuts.
✂️ Step 1: Identify the Right Time to Pinch
Pinch back chrysanthemums when they reach 4-6 inches tall—typically 4-6 weeks after transplanting. Look for stems with 4-5 sets of true leaves (the larger leaves after the initial seed leaves). This timing ensures the plant has enough energy stored to branch out vigorously. I always check the leaf count rather than guess by height—some varieties grow faster than others.
If you miss the first window, don't panic. You can still pinch back when plants hit 8-10 inches, though you'll sacrifice a few weeks of blooming time. Just avoid pinching after July 1st in most climates—late pinching delays fall color and weakens winter hardiness. Chrysanthemums need 10-12 weeks of growth to produce strong blooms, so work backward from your first frost date.
✂️ Step 2: Locate and Make the Pinch
Find the 5th or 6th set of leaves counting upward from the soil line. This is your target spot—the pinch should remove the top 1-2 inches of growth, just above a leaf node where new branches will emerge. Use clean, sharp pruners or your fingers (I prefer fingers for small stems to avoid damaging tender tissue).
Don't pinch too close to the base—you'll leave no leaves to photosynthesize and support new growth. Also avoid pinching right above a flower bud if one has formed. The goal is to encourage lateral branching, not remove potential blooms. You'll see tiny side buds forming within 7-10 days—that's your confirmation the plant is responding.
✂️ Step 3: Repeat for All Main Stems
Pinch back every main stem on the plant, including any side branches that have grown 4-6 inches tall. This creates a fuller, more compact plant structure. I work systematically—start at the largest stem and move outward to smaller branches. For large mums, you might need to pinch 2-3 times total during the season, spacing each session 3-4 weeks apart.
After pinching, water deeply to help the plant recover. The first few days are critical—you'll notice leaves may wilt slightly as the plant redirects energy. Don't fertilize immediately; wait 2 weeks to give roots time to adjust. Once new growth appears, apply a balanced 10-10-10 fertilizer to support the increased foliage and future blooms.
☀️ Step 4: Adjust Light and Water for Recovery
Move pinched plants to a location with full sun (6+ hours daily)—they'll need extra light to recover and branch out. If your climate gets very hot, provide afternoon shade to prevent stress. You'll see the difference within 2 weeks: instead of one tall stem, you'll have 3-5 smaller, bushier stems forming.
Water consistently but avoid soggy soil. Chrysanthemums are drought-tolerant once established, but newly pinched plants need 1 inch of water weekly during dry spells. Check soil moisture by sticking your finger 1 inch deep—if it feels dry, water thoroughly. Mulch with 2-3 inches of organic mulch to retain moisture and protect roots from temperature swings.
⏰ Step 5: Monitor Growth and Prepare for Blooming
About 6-8 weeks after your final pinch, you'll notice flower buds forming at the stem tips. This is the moment that matters: stop all pinching immediately. The plant now needs to focus energy on developing blooms rather than foliage. Remove any remaining leggy stems that haven't branched—these won't produce quality flowers.
For the best display, space plants 18-24 inches apart in the garden. Deadhead spent blooms by snipping stems back to the nearest leaf node to encourage continuous flowering. With proper pinching, your chrysanthemums will produce 2-3 times more blooms than unpinched plants, and each stem will be thicker and more robust.
Tips & tricks for perfect chrysanthemum pinching
Here's what nobody tells you about transforming those tall, leggy stems into lush, blooming bushes.
Timing is Everything: The 4-6 week window after transplanting is your best shot for maximum branching. I learned this the hard way—pinching too early means the plant hasn't built enough energy, while waiting too long sacrifices bloom time. Check leaf count rather than height: those 4-5 sets of true leaves are your golden target. For late starters, you can pinch at 8-10 inches, but expect delayed blooms.
The Technique That Changed Everything: When you pinch that 5th or 6th leaf node, make it clean but don't crush the stem. I use my thumb and forefinger for small stems—it gives me better control than pruners. The key is removing just 1-2 inches of growth while leaving that leaf node intact. This tiny spot holds the magic for new branches. Watch for those side buds appearing in 7-10 days—they're your confirmation the plant is responding.
Recovery Strategy: After pinching, those first two weeks are critical. The plant is redirecting all its energy, and you'll see temporary wilting. Don't panic—this is normal! Water deeply but consistently (1 inch weekly), and resist the urge to fertilize immediately. Wait those 2 weeks to let roots establish before adding nutrients. I've seen plants recover beautifully when given this breathing room, but they'll struggle if pushed too soon.
Pro Tips for Pinch Back Chrysanthemums
- Here's what nobody tells you about transforming those tall, leggy stems into lush, blooming bushes.
- Timing is Everything: The 4-6 week window after transplanting is your best shot for maximum branching.
- The Technique That Changed Everything: When you pinch that 5th or 6th leaf node, make it clean but don't crush the stem.
Frequently asked questions
Got questions about pinching back chrysanthemums?
You’re not alone! Here are answers to the most common concerns—from timing to troubleshooting—to help you master this pruning technique like a pro.
When is the best time to pinch back chrysanthemums?
Pinch back chrysanthemums in early summer (around June) when plants are 6–8 inches tall. Repeat every 4–6 weeks until mid-summer to encourage bushier growth and more blooms. Avoid pinching after early August—this can delay flowering or reduce bloom quality.
What if I missed the ideal pinching window?
Don’t stress! If you missed early summer, you can still pinch back until early July for some benefit. However, pinching later may not yield as many blooms. Focus on light pruning (removing just the top set of leaves) instead of aggressive pinching to avoid stunting growth.
How many leaves should I leave after pinching?
Aim to leave 3–5 healthy leaves per stem after pinching. This ensures the plant has enough energy to produce new shoots and flowers. If you leave too few leaves, the plant may struggle; too many, and you’ll limit bushiness. Think of it as a balance between encouraging growth and maintaining strength.
Will pinching back chrysanthemums make them bloom later?
Yes! Pinching back delays flowering by encouraging the plant to focus on foliage growth first. This results in larger, fuller blooms later in the season. If you want earlier flowers, skip pinching or only do it lightly. The trade-off? Smaller, less abundant blooms.
What if my chrysanthemums look leggy or weak after pinching?
Leggy growth after pinching is normal but can be fixed! Ensure your plants get 6+ hours of sunlight daily and consistent watering (keep soil moist but not soggy). If needed, use a balanced fertilizer (like 10-10-10) every 4–6 weeks to boost recovery. Avoid over-fertilizing, which can burn roots.
Can I use pruning shears instead of pinching with my fingers?
While shears work, finger pinching is preferred because it’s more precise and less damaging to the plant. If you use shears, sterilize them first (rubbing alcohol works) to prevent disease. For small stems, shears can create jagged cuts, which may slow healing—so stick to fingers for the best results!
Wrapping up and next steps
Pinching back chrysanthemums is your secret weapon for lush, vibrant blooms that last all season! By mastering this simple technique—removing those early buds and shaping your plant—you’ll encourage fuller growth and longer-lasting flowers.
Remember, timing and consistency are key, so stay patient and observe your chrysanthemums as they respond to your care. 🌸
Now that you’re armed with the know-how, grab those shears and give your chrysanthemums the attention they deserve! Ready for even more gardening success? Explore advanced pruning techniques or dive into seasonal care tips to keep your garden thriving year-round. Happy pruning! ✂️🌿